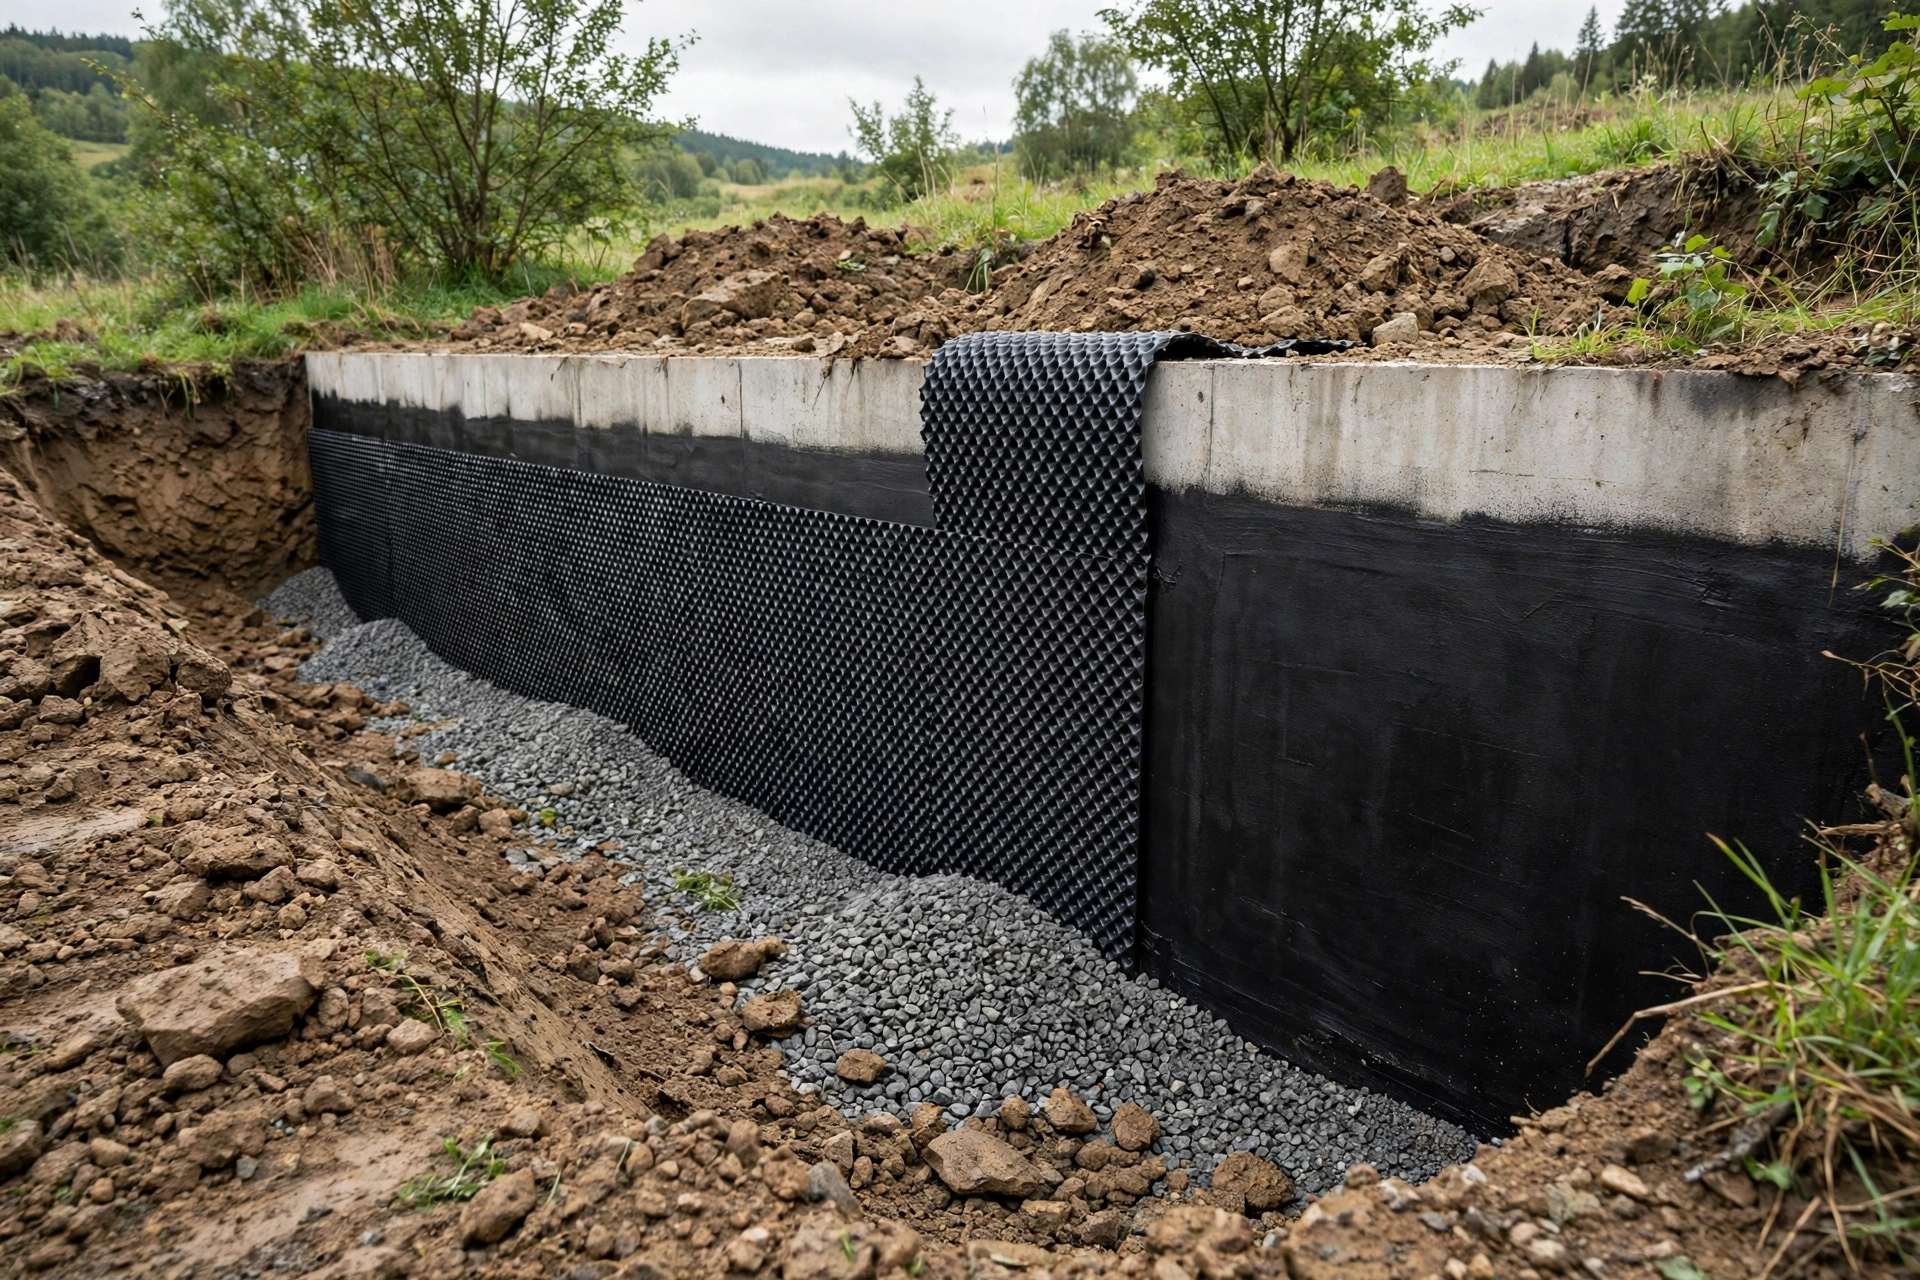
An exterior drainage mat is a dimpled plastic sheet fixed to the outside of a below-grade foundation wall, over the waterproofing membrane, whose job is to give groundwater a fast, open path down to the footing drain instead of letting it press against the wall. Without that path, water builds up in the soil, pushes against the membrane with hydrostatic pressure, and eventually finds its way through a crack, a seam, or a penetration.
The mat does three things at once: it drains bulk water, it breaks capillary action so damp soil cannot wick moisture against the concrete, and it shields the membrane during backfilling. A below-grade waterproofing assembly without a drainage layer is only half a system — the membrane can be perfect and still fail early if water stands against it.
How Exterior Drainage Mats Move Water Away From a Foundation Wall
The mat works by holding itself away from the wall. Its dimples — small raised cups moulded into a sheet of high-density polyethylene (HDPE) or polypropylene — face the concrete and create a continuous air cavity between the plastic and the wall. Water reaching the foundation surface drops into that cavity and runs freely down by gravity to the perimeter drain at the footing.
That free-draining action relieves hydrostatic pressure, the force of standing water in the soil. Pressure is what pushes water through the smallest defects in a membrane, so removing the pressure extends the membrane's life far more than any thicker coating could. The cavity also lets the wall breathe and dry toward the outside, which matters in older homes.
What Dimpled Cores, Geotextile Faces, and Composite Boards Offer
The simplest drainage mat is a bare dimpled sheet: HDPE formed into a repeating pattern of knobs, fixed directly to the wall with the dimples facing the concrete. It drains well and costs little, but it has no filter, so fine soil particles can eventually wash into the cavity and slow the drainage. On clean, sandy backfill that rarely matters; on silty or clay soils it can.
Composite drainage boards solve the filter problem by bonding a non-woven geotextile fabric to the dimpled core. Water passes through the fabric freely while soil particles are held back, so the drainage path stays open for the life of the building. The geotextile also cushions the membrane beneath, adding protection during backfilling. Most residential below-grade work today uses a composite board for exactly these reasons.
HDPE, Polypropylene, and Composite Cores
HDPE is the most common core material because it is tough, chemically resistant in soil, and holds its dimple shape under the weight of backfill. Polypropylene cores offer higher compressive strength and are often chosen for deep foundations. Composite boards — a dimpled core bonded to a geotextile — cost more than a bare sheet but combine drainage, filtration, and protection in one product.
| Mat type | How it drains | Best use | Limitation |
|---|---|---|---|
| Bare dimpled HDPE sheet | Open air cavity behind dimples | Sandy backfill, shallow walls | No filter — fines can clog the cavity |
| Composite drainage board | Dimpled core plus geotextile face | Most residential foundations | Costs more than a bare sheet |
| High-strength polypropylene | Deep dimples, high crush resistance | Deep foundations, heavy loads | Stiffer — harder to fit around corners |
| Drainage mat with protection course | Core plus bonded protection layer | Rough backfill, rocky soil | Thicker — needs more trench width |
That comparison covers the common choices, but the manufacturer's data sheet should always confirm the flow capacity and compressive strength for the actual depth and soil on the site. A mat that drains well at two metres may be crushed flat at four, and a crushed mat drains nothing at all.
Where Drainage Mats Fit in the Below-Grade Waterproofing Assembly
A drainage mat is never the waterproofing itself — it is the layer that protects and serves the waterproofing. The assembly, from the wall outward, typically runs: the concrete or block foundation wall, a parging or smoothing coat where the substrate is rough, the primary waterproofing membrane (a self-adhered sheet or liquid-applied membrane), then the drainage mat, then filter fabric if the mat has none, then drainage stone and backfill. Each layer has one job, and the mat's job is drainage and protection.
The order matters because each layer depends on the one beneath it. The membrane must be fully bonded and cured before the mat goes on, or the mat's fasteners can puncture a membrane that has not yet set. The mat must be in place before backfilling begins, because backfill dropped directly against a bare membrane will tear it. And the footing drain must be in place before the mat's bottom edge is set, because the mat is useless if its water has nowhere to go.
On an existing home the assembly is usually reached by excavation, the most thorough waterproofing option there is: dig down to the footing, repair the wall, apply the membrane, install the mat, replace the drain, and backfill with drainage stone. It is disruptive and costs more than any interior fix, but it is the only approach that stops water before it ever touches the foundation.
Preparing the Wall and Membrane Before the Mat Goes On
Preparation decides whether the mat will work for decades or fail in its first season. The wall must be clean, sound, and reasonably smooth: loose material brushed off, cracks and honeycombing repaired, and sharp projections ground down so they cannot puncture the membrane or the mat. On block foundations, a parging coat fills the mortar joints and gives the membrane a continuous surface to bond to.
The membrane itself must be inspected before it is covered, because once the mat is on, the membrane is hidden for the life of the building. Check every lap, penetration, and corner. A lap that is not fully bonded or a penetration without a proper seal will leak eventually, and no drainage mat can compensate for a membrane that was never watertight.
- Clean and repair the substrate brush off loose material, fill cracks, and grind down sharp projections before anything goes on.
- Smooth block walls with parging a thin cement coat gives the membrane a continuous surface and fills the mortar joints.
- Let the membrane cure fully do not fix the mat over a membrane that is still soft or tacky.
- Inspect before covering check every lap, corner, and penetration now, because the mat will hide them for decades.
That last point is worth repeating to any contractor on the job: the inspection happens before the mat goes on, not after. A photograph of the completed membrane, with laps and penetrations visible, is cheap insurance against a dispute later about whether the waterproofing was ever installed properly.
Installing the Mat: Fastening, Overlaps, and the Footing Drain Connection
Installation starts at the top and works down. The mat is unrolled vertically against the wall with the dimples facing the concrete, the top edge secured with a termination bar or fasteners and sealed so surface water and debris cannot enter the air gap. Adjacent sheets are overlapped both vertically and horizontally, typically by at least 150 millimetres or three to five full rows of dimples, so the drainage path stays continuous across every joint.
The bottom edge is the most important connection in the whole system. The mat must extend down past the footing and into the crushed stone bed of the perimeter drain, so water channelled down the mat drops straight into the perforated pipe and is carried away from the house. A mat that stops short of the drain, or one whose bottom edge is buried in silt, leaves its water with nowhere to go — and water with nowhere to go finds its way through the wall instead.
Fastening needs a light touch. The mat is typically held with specialised fasteners or a termination bar at the top edge, not peppered with fixings across its face, because every fastener is a hole through the system. Large hollows should be filled first so the mat does not span a void and crush under backfill pressure.
Terminating the Top Edge So Soil Stays Out
The top edge of the mat must be sealed and secured, or the whole system is compromised from above. Surface water and fine soil entering the air gap from the top will clog the cavity from the inside, and a mat that slips down under its own weight leaves the upper wall unprotected. A termination bar screwed to the wall with a bead of sealant, plus a strip of membrane lapping over the top of the mat, closes the gap properly.
Which Drainage Mat Suits Deep Foundations and Heavy Water Loads
Depth and water load decide the mat. A shallow foundation in sandy soil with a low water table can use a standard dimpled HDPE sheet and perform well for decades. A deep foundation — three metres or more — needs a mat with higher compressive strength and greater flow capacity, because the soil load at that depth is far higher and the volume of water to move is larger. A high water table or a site with heavy clay demands a composite board with a robust geotextile, because fine particles will otherwise clog the system.
Flow capacity is the number to check on the data sheet, usually given in litres per minute per metre of width. A site with a high water table or a slope directing water toward the house needs a higher-capacity mat than a flat site with free-draining soil. When in doubt, the heavier mat is the safer choice — the cost difference is small compared with excavating a failed system.
Soil type matters as much as depth. Clean sand drains on its own and asks little of the mat; silt and clay hold water, carry fines into every opening, and punish any drainage path that is not filtered. On clay sites, the geotextile face is not optional, and the backfill against the mat should be drainage stone rather than the excavated clay, which would simply re-create the problem the mat was installed to solve.
| Site condition | Recommended mat | Why |
|---|---|---|
| Shallow wall, sandy soil | Standard dimpled HDPE sheet | Low load, free-draining backfill |
| Deep foundation, over 3 m | High-strength polypropylene core | Resists crushing under soil load |
| High water table | Composite board, high flow capacity | Moves large volumes quickly |
| Clay or silty soil | Composite board with geotextile | Filters fines that would clog the cavity |
| Rocky or rough backfill | Mat with bonded protection course | Shields the membrane from punctures |
That table is a guide, not a design. A geotechnical report or an experienced waterproofing contractor should confirm the choice for any site with a high water table or a history of basement water problems.
Drainage Mat Failures and How to Spot Them After Backfill
A drainage mat usually fails quietly, and the first sign is often water in the basement that the mat was supposed to prevent. The most common failure is a clogged cavity: fine soil entered through an unsealed top edge or through a torn geotextile, and the drainage path slowly closed. The second is a crushed mat, usually where a heavy load or a sharp stone pressed the dimples flat during backfilling. The third is a disconnected bottom edge, where the mat never reached the footing drain and its water ponds at the base of the wall.
Spotting these failures after backfill is detective work. Damp patches low on a basement wall, efflorescence (white mineral deposits) near the floor, and a sump pump that runs constantly all suggest the exterior drainage is not working. A camera inspection of the footing drain can show whether water is reaching it; if the drain runs dry in wet weather while the basement stays damp, the mat's water is not getting to the drain.
- Damp low on the basement wall water is reaching the wall instead of the drain — suspect a clogged or crushed mat.
- Efflorescence near the floor mineral deposits mark where water has been evaporating through the wall over time.
- Sump pump running constantly the drain may be working, but the mat may be feeding it more than it should — or not at all.
- Drain dry in wet weather if the footing drain stays dry while the basement is damp, the mat is not connected to it.
Fixing a failed mat means excavating again, which is why the installation details matter the first time. There is no interior repair that restores an exterior drainage plane: the mat can only be inspected or replaced from the outside, with the soil removed. That reality is the best argument for doing the overlaps, the top termination, and the footing connection properly on day one.
Exterior Drainage Mat FAQs for Below-Grade Waterproofing
Is a drainage mat the same thing as waterproofing?
No. The waterproofing membrane is the barrier that stops water; the drainage mat is the layer that carries water away from the membrane and protects it from damage. A mat without a membrane will not keep a basement dry, and a membrane without a mat will fail sooner under hydrostatic pressure.
Can a drainage mat be installed without excavating the foundation?
No, not on the outside. The mat must be fixed to the exterior face of the foundation wall, which means excavating down to the footing. Interior drainage systems manage water after it enters, but they cannot replace an exterior mat.
How long does an exterior drainage mat last?
A properly installed HDPE or polypropylene mat should last the life of the building — the plastic does not rot in soil. What fails is usually the installation: a clogged cavity, a crushed section, or a bottom edge that never reached the drain.
Does a drainage mat replace the footing drain?
No. The mat and the footing drain are partners: the mat collects water from the wall face and delivers it to the drain, and the drain carries it away from the house. Either one without the other leaves water with nowhere to go.
What does exterior waterproofing with a drainage mat cost?
Costs vary widely with depth, perimeter length, soil, and access, but a full exterior job — excavation, membrane, drainage mat, new footing drain, and backfill — is a major project, often running into five figures for a typical house. Get several detailed quotes and compare the full system.
Final Thoughts: A Dry Basement Starts With a Working Drainage Plane
A dry basement is not the result of one product. It is the result of a system: a sound wall, a properly bonded membrane, a drainage mat that carries water to a working footing drain, and backfill that lets the whole assembly do its job. The mat is the quiet middle layer of that system, and it is the one most often skipped to save money. Spend the money, install it properly, and the basement will stay dry for the life of the house.